Friday, May 21, 2010

Buying a Queen

If you've been following this blog you'll know I desperately need to requeen Mary.  And that I'm waiting for a local queen breeder to have queens ready.

Today I got an email from the local breeder.  In it he said,...


 "Bear ate the first batch.  Next will emerge at the end of  May"

I swear anything that can go wrong will go wrong when it involves Mary!

*

Thursday, May 20, 2010

Inspection 5/20/10

Mary
68 f
Cloudy

Mary has been busy lately.  She spent a almost 2 weeks at my place of work before being moved to a new Stand in the back yard.  While 'at work' she was in full sunlight.  Something we don't have here in the yard.  She used it wisely too.  Her activity level increased remarkably so her population looks good now.  The spot at work is a good one.  I'd like to use it all the time.  Right now it serves as only a temporary spot for moving hives & swarm catches.

The bees are working all 10 frames of the single Deep box.  The population has filled the box.  The number one reason I went in was to check for Swarm cells.  None were found but there were some queen cups in the 'swarm position' on frame 6 & 2 cups in the 'Supersedure position' on frames 1 & 2.  Right now 6 frames are filled with eggs, larva, & pupae.  There was a handful of drone cells.  Mostly on the bottom of frame #6.  There were a few isolated drone cells mid-frame in a few spots too.  They have even filled the end frames with fresh honey.  For a week colony they are looking about as good as they can.

Chalkbrood is still an issue.  A little on every brood frame.  Frame 2 is half gone with it.  Hence the dire need to requeen her.  I'll be seeing a beek this weekend who has queens.  I hope they're ready.  Although I couldn't find the queen today at all.  My beek neighbor helped me look but neither of us could find her.  I was ready to mark her but no luck just yet.

The bees are making lots of bridge comb.  The frames aren't too bad but I'd like to see less of it.  I scraped the propolis off each frame a while back to maintain the right bee space.  Yet every frame had a spot or two of it.

After all that it was time to add the second deep box.  This is almost the same box & frames she had on her last year.  I took them off when her population crashed last Winter.  After it came off the frames went into the freezer and the box was retired.  The box was original equipment from when I bought the hives.  I wanted to put it back on last week but after I thawed the frames the Wax moths found them.  I had to refreeze the frames for a few days to fix that problem.  One frame has a new wood part after I dropped & broke the old one.  I just transferred the old comb (plasticell) right into the new frame. A few others were cleaned up a bit with a sander.  The box is new.

The frames in the second Deep Box

Before I put the frames in the box each one got sprayed with sugar syrup.  As soon as the box went on the bees started to move up into it.  I didn't pull any of these out to look.  I'll check them in a week or so.

I put the hive top feeder on with a gallon of 1:1 syrup in it.  I hope that will help the bees produce extra wax.  That way they can quickly repair the wax moth damages cells in the second box.

*

Sunday, May 16, 2010

New Brood Boxes

Yesterdays inspection showed that the New Colony (Duchess) needs an additional brood box.  Today I assembled the crimped-wire wax foundation frames and sprayed them with sugar syrup.  I finished painting 2 Deep Hive Bodies a day ago.  One is for the new hive and the other is for Mary.  I filled one with the frames and put in on the New Colony.  I used the smoker but didn't need it.  The bees were very calm.  The Hive top feeder was full, so that slowed things up a bit.  The 2010 package is now a Double-deep hive.  Moving right along.

I wanted to add-on to Mary today as well but couldn't.  I took her stored frames out of the freezer a few weeks ago to thaw.  Today when i opened the trash bag they were in I saw wax moths.  Dang it!  So i put them back in the freezer for a few days to kill them off.  I thought the trash bag would protect them but was wrong.  Oh well, lesson learned.

Mary's new DHB replaces an old DHB only; no new frames.  It will be filled with the established frames from the old DHB.  It was removed when Mary's population crashed last Winter.  She was reduced to a single DHB at the time.  The established frames are almost full, with honey & pollen.  Though there are some bare areas where I scraped the wax moth damage off.

I'll inspect Mary in a day or so when i can put the new box and frames on.  I expect to find the she has filled her current brood box.  If so it won't take long for her to fill the holes in the second brood box.  That being the case I could feasibly start adding honey supers to her if her population grows fast enough.  Her re-queening is still on schedule as soon as the breeder has them available. 

*

Saturday, May 15, 2010

Inspection 5/15/10

2010 Hived Package (Duchess)
82 f
Partly Sunny


There have been reports of Small Hive Beetle in the packages that many of us received back in April.  My neighbor found one in her new hive and has since taken measures to control it.  I went into the new hive today looking to see if I could find any; hoping I wouldn't.  I went through each frame and didn't see any.  But I missed the Queen as well, and she's marked,  so I'll continue to watch for them.

The Hive top feeder was about at the empty mark.  What little was left had a thin crystallized cap on it.  I didn't get to it earlier this week due to a bout with the flu.  Nothing too bad, just enough to keep me inside.  I'll refill the HTF and monitor it better this time.

Only about a cup of syrup is left under a sheet of rock candy

The brood nest has grown at a modest rate.  3 undrawn frames remain while the rest are filled with brood, pollen, & honey. The first frames to have comb have a spotty brood pattern look to them.  The latter drawn frames have a more contiguous pattern.  I'm sure that's just an issue with cell availability at the beginning of the hive. 


Check the bur comb on the Drone frame

  Frames:
  1. Undrawn
  2. 1/2 drawn. Eggs, pollen, capped honey
  3. Fully drawn. Mostly brood, lots of eggs and larva.  Pupae & Capped honey.  *Odd comb structure (the sheet not a cell)
  4. Fully drawn. Eggs & pupae
  5. Fully drawn. Eggs & mostly pupae. Some drone cells maybe.  hatching bees.
  6. Fully drawn. Pupae, capped honey, pollen 
  7. Done Frame - Fully drawn. Patch of pupae, some capped honey.  Mostly uncapped honey.
  8. 1/4 drawn. Capped honey.
  9. Undrawn
  10. Undrawn
None of the frames had been propolised together.  Very clean throughout the hive.  The colony looks good.  It may be time for me to add the next Deep hive body.  
 
Frame 5 where the Queen cage was hung
 
Above you can see a spotty brood pattern in the middle of the frame.  That is where the Queen cage hung during installation.  After which the bees filled the hole with comb.  So that area lags behind the rest of the frame.  Currently it has eggs, pollen, & honey in it.
 
 Pierco Drone Frame

These frames would be great in Honey suppers.  They hold more honey because there is less wax.  The cell size is much bigger than the other frames to fit the larger size of the drone bees.  The queen can tell what kind of egg to place in a cell by feeling the size of a cell with her front legs.  Therefore all the eggs laid in this frame will become drones.  This frame is noticeably heavier than the other frames.  

Odd thing is that these bees like to bur comb the plastic.  This is the only frame to have bur comb both on the top and the bottom.  Maybe they don't like the plastic.  I know I'm liking it less & less in the brood chambers, meaning the plasticell & the Pierco drone frame.  At Dadant's the other day all I bought was crimped-wire wax foundation.  

Bur comb on the bottom of the Hive top feeder

Can you guess where the plastic drone frame was?  I'm not yet sold on the notion of using a drone frame to reduce to number of Varroa mites.  Yes it works, i'm sure, but I'd rather have a frame producing thousands of bees than drones & mites.  And since the frame is to be frozen before the drones hatch, to kill the mites, the frame really doesn't produce anything at all for the hive.  It may be that I will take them out for now.  In the event of a mite infestation I could put them back in then.  In the meantime I can be producing lots of bees.

A question of Supersedure came up during the last inspection.  I could not find and Queen cups of Supersedure cells.  However, I didn't find the marked Queen either.  There are lots of new eggs on the outer frames though.  So I don't know what to say.  An experienced beek told me her packaged bees may have superseded after only 22 days in the hive!  So both of us are interested in what these girls do.  Hopefully I'll find the queen next week.
*

Thursday, May 6, 2010

Tut Tut, it looks like Rain....

~An account of the adventures of Hemlock and the honey tree, written by his loving spouse.~

I am going to make the giant leap here that most of the folks reading this will have seen the classic "Winnie the pooh and the Honey tree". That wonderful tale where Pooh grabs some balloons from Christopher Robin and  rolls in some black mud and floats up to the honey tree all the while having Christopher say "Tut tut, it looks like rain" as our delightful little bear is suppose to be a little black rain cloud.

Our story has a similar vein to it. While out walking a timber tract soon to be logged, Hemlock discovered a "Honey Tree". He had the loggers leave the tree, and thus began our adventure.


A very happy and healthy hive in a dead and soon to be falling down Poplar tree.  Unlike our intrepid Pooh with his balloons, my insane creative beekeeping husband decided to borrow a friends deer stand last Saturday (May 1st) to get close to the hive.

Can you hear him? " Hello? it's just maintenance.  Pay no mind!"

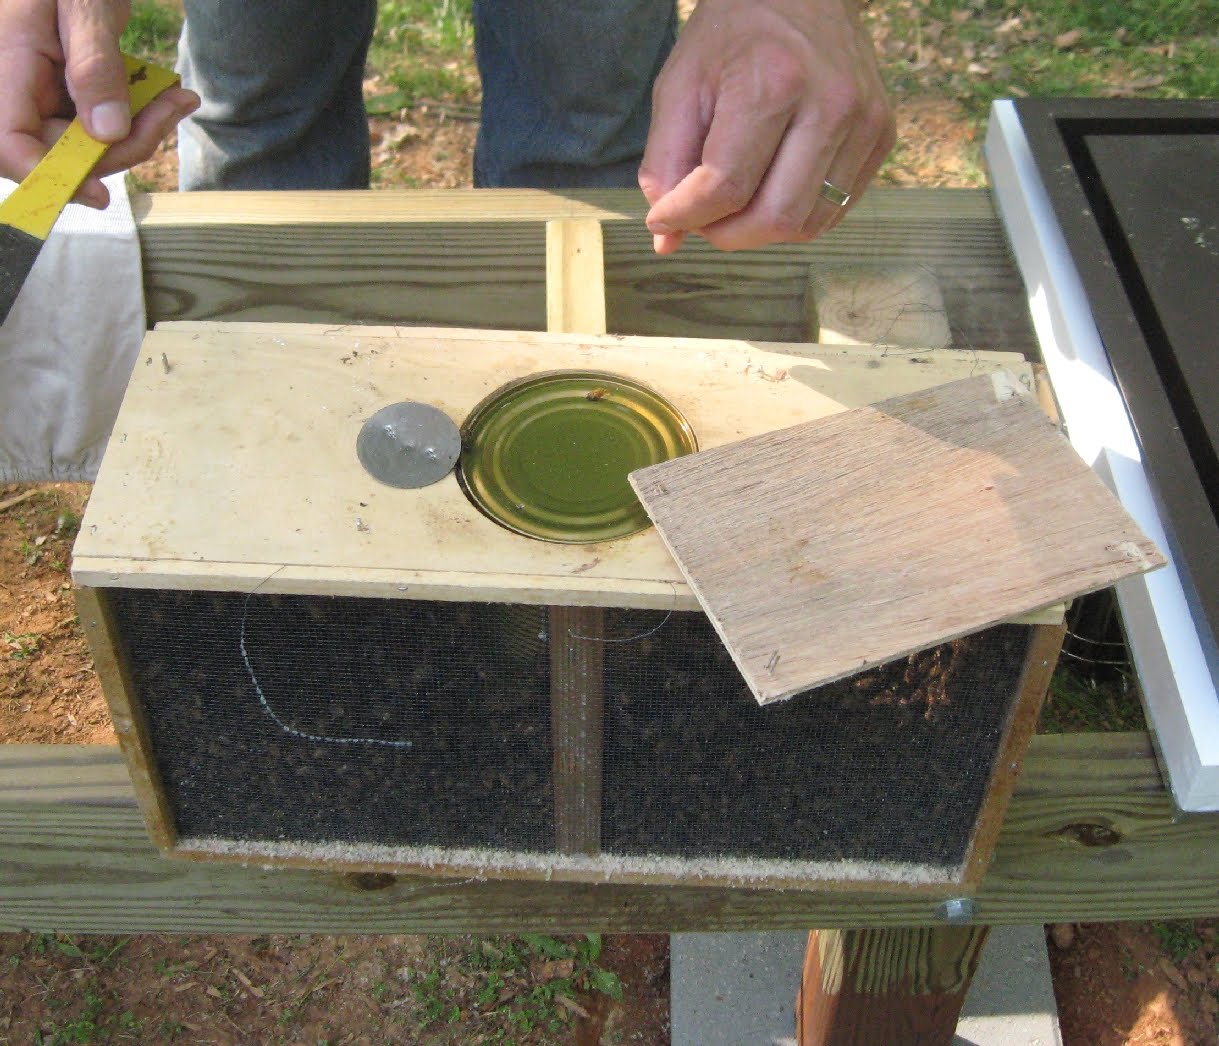
Did I mention this hive is 14 feet OFF the ground? Oh, well it is. The next step was to knock on the hive with a hammer as he placed a piece of metal sheeting over the hole to narrow the entrance down. Any gaps or openings of which there were just a few were filled with cloth strips.


All the time he is knocking these lovely ladies are coming out to see whats going on yet being distracted by him spraying sugar water on the opening of the hive. At this point I am muttering under my breath "Tut tut, it looks like rain" in the hopes that maybe a rain cloud would appear and spare me from 91 degrees in the middle of a clear cut. (no such luck)


The most amazing thing about these little ladies is not only did they survive the worst winter we have had here in 50 years, but, they were mostly non-defensive! They simply did not mind any of the "big bears" shenanigans.  After this task was done we took a break and came back later for the final leg of our adventure.


It is a little before twilight here and you can see the 4x4's and 2x4's nailed together to get the box to the right height. There is also the aluminum tubing that will be connected to the hive body that is visible in the above photo.


The tricky part was attaching the tubing to the hive body with out pulling it away from the entrance. It took a couple tries and then we were set. 

The next section is more where we segue into Mutual of Omaha's Wild Kingdom. If you notice, Marlin Perkins is geared up in all his beekeeping duds. I, his faithful assistant "Jim" am not so attired. Although I am not trying to circumcise a water buffalo, I am handing him up each individual wax frame while a Bazillion (that's my girly technical term) wild bees are buzzing me! By the way, it's still hot with the temperature in the upper 80"s with tons of humidity.


Once all the frames were in the box and the lid in place the last thing left to do was to secure the hive in case of wind. One strap secured it to the tree and another secured it to the deer stand.

The idea behind all of this is a hope that the bees will go through the tubing into the hive and utilize all of the empty frames in there. That way once it's full, Pooh Bear can make off with the genetics of this wild hive.


This last one is a personnel favorite, and no "Jim" did not revolt against the beekeeper and shoot him dead on his hive; even though that's what it looks like. I promise he is still kicking and awaiting his next opportunity to go out and see if a beekeeper of very much brain was able to succeed in saving this hive.
- - -   - - -   - - -

Wednesday, May 5, 2010

Second Aniversary

Today marks our second anniversary of Beekeeping.  2 years ago we woke up to our first full day with bees in the yard.  The previous evening at Sundown my Wife & I drove to a farm 15 miles away, packed Mary & Myrina onto the back of our truck and drove them back to our awaiting yard.

I only had the 'Beekeeping for Dummies' book for reference.  I didn't know any beeks and knew nothing of clubs or online forums.  Saying I was a bee-haver would be generous.  Yet ignorance was bliss and we eventually harvested 75#'s of the best honey ever!

The first winter was mild & spring brought some surprises.  We got to watch the bees swarm a few times & I began to realize Mary was having troubles.  Also 2009 was the worst honey year on record here due to the rain.  Mary continued her downward spiral as I desperately searched for answers.  There would be no honey yield in '09 but in October I found the Piedmont Beekeepers Association & the online forums.  The many great people in the association and on the forums answered my questions and helped me better understand what my role as a beekeeper really is.

The Winter of  2010 was then the hardest winter in decades.  Many colonies in the area died as a result.  Mary's number came up too.  Yet We were able to save her hive by bringing it in the house.  Still though Mary's & Myrina's populations were greatly reduced.

Now into Spring.  I've completed the local Beginners Bee Course.  Plus we've bought a package of bees and I'm trying to hive a wild colony in the woods.  We might end the year with 4 colonies but only Myrina has enough bees to make honey.  We'll see.

Meanwhile there's new contacts to make both at the club & online.  I have so much to learn and do before next winter.  All of it will be posted here as it happens.

Our appreciation goes to many for the support we have received.  The great information, good conversations, or even moral support offered by many of you.

Thank you.

Saturday, May 1, 2010

Wild Bee Tree Colony Chronolog

June 25, 10 - (PROJECT ABANDONED)
SBB, DHB1, MC
Frames per box = 10

DHB1 Foundation = Crimped Wire
Queen spotted = yes, no, didn't look,
(n/a)
Brood Present= yes, (no), didn't look,
Brood Pattern = solid, spotty, (n/a)
Frames with Brood = 0/10, didn't look
Drone Cells = yes, (no
), didn't look
Population = (0), critical, low, moderate, good, high
Condensation = (none), minor, major
 
Current Pests =None
  • Hive unaccepted

May 1, 10
SBB, DHB1, MC
Frames per box = 10

DHB1 Foundation = Crimped Wire
Queen spotted = yes, no, didn't look,
(n/a)
Brood Present= yes, (no), didn't look,
Brood Pattern = solid, spotty, (n/a)
Frames with Brood = 0/10, didn't look
Drone Cells = yes, (no
), didn't look
Population = (0), critical, low, moderate, good, high
Condensation = (none), minor, major
 
Current Pests = Beekeeper
  • Add 10 frames of crimped wire wax foundation
  • Spray foundation with 1:1 sugar spray
  • Use Migratory Cover instead of T-cover
  • SBB open
  • Assemble hive on deer-stand in front of tree entrance (14')
  • Connect hive to entrance with 3 inch tubing
  • Strap hive to stand & tree
  • Bees not aggressive

First attempt to collect wild bees from a Bee Tree

Thursday, April 29, 2010

Inspection 4/29/10

Mary
75 f
Sunny

At least she's consistent in her problems...

I took off the T-cover to look at the Hive Top Feeder.  It was about a quarter full of crystallized sugar.  All of that was dumped on the ground away from the hive.  The ants & dogs will appreciate that.  Though there were still some bees in the HTF working the candy.  It will be put away for now.  The nights are now in the 50's & 60's so the bees won't be clustering anymore.

Beneath the HTF was the brood nest in the deep hive box.  The population looked great.  Few of the bees stolen from Myrina are left.  They still make their presence known during inspections by becoming hyper-defensive.  The rest of the girls are Mary's.  They have 4 full frames of capped brood right now.  Unfortunately the brood pattern is spotty.  Which is a sign the Queen is weak.  I have already talked to a local queen breeder about buying one as soon as he has some.  Mary was weak all last year.  I didn't understand that until late Fall when it's too late to requeen.  Now is the time for that.

Another sign of a weak queen is chalk brood.  Which i found several cells worth in the middle of the nest.  I knew it would happen.  That's why I talked to that queen breeder 2 months ago.  But I must say for a fading Queen Mary is doing better than expected.  If she can keep it going for a little while longer she'll have done her part.  After which with the new Queen the spotty brood & chalk brood will go away.

Speaking of which Queen Mary was found on frame 5 milling about.  I meant to mark her today but forgot to borrow the marking pen from my neighbor; now a new beekeeper herself.  I mark her next time.

I have been wondering how the bees will handle making drone cells on Plasticell.  It's cell size is smaller than drone cell but not by much.  Mary's girls made some drone cells on the bottom of 1 frame; not unusual.  However, they half attached it to the imprinted Plasticell foundation & half on the wood frame.  That way they could make it that little bit bigger that they needed.  I've not yet found any drone cells in the middle of the frame.  I'm thinking they won't but am waiting to find out. 

Also on the bottom of the frames I found a few Queen cups.  These differ from the queen cups in the New Hive due to their location on the frame.  Queen cups on the bottom of the frame would become Swarm cells.  When a Swarm cell hatches the OLD queen takes half the colony and leaves the hive for good.  They then setup shop elsewhere as a new colony.  The New queen from the swarm cell stays in the original hive to carry on the where the Old queen left off.  Not enough space in the hive is one reason for a colony to swarm.  This may be a indicator that this hive needs another deep hive box put on the hive.  With extra room for brood the colony will be less likely to swarm.  So I'll put another brood box on this hive this week, as soon as it's painted.

Finishing the inspection had a slight bump.  Without the HTF i need to put the Inner Cover on.  I don't have one I'd use.  Mary's old one from fall was puled off when I moved her back outside.  It was plastered with crystallized sugar & Nosema droppings.  The leaking syrup also warped the cover.  I'd rather burn it than use it.  For now I'll leave the HTF on but with water in it.  What rock sugar i couldn't knock out will sweeten the water.  I'll make another IC this week and put it on next weekend.

To review:
Spotty brood & chalk brood.
She needs a DHB and a IC.
Oh...and a new Queen!

Wednesday, April 28, 2010

Inspection 4/28/10

New Hive (Duchess)
71 f
Partly Sunny

They finished their first gallon of 1:1 medicated syrup the previous day.  I added another 1/2 gallon of unmedicated then, yesterday evening.  There were a handful of drowned bees in the HTF then but none today.  I check each day now to see how fast they're taking it. 

Once the HTF was off I was able to see that the bees were working in frames 4 through 7.  I pulled the cage frame and saw the Queen had been released.  They had not built too much comb around the cage.  It came out with only a small tug.  The rest of the frame had been mostly drawn out & somewhat filled with pollen & syrup or nectar.

Bees working 4 through 7
(click to enlarge)
-

Almost capped syrup at the top

Frames 4 through 7 were close to being completely drawn out.  Beautiful white wax.  They had also capped a small patch of syrup on frame 4.  The frames were a mix of new wax & old wax.  The bees used the old wax from the rewaxing effort to build the comb down on the lower half of the frames.

Frames 5 & 6 is where the eggs were at.  Closer to the top of the frames mostly.  There was also pollen & syrup on the ends.  The bees obscured the view but I'll say half of the typical brood nest area had eggs on each frame.  The Queen was on frame 5.  Busily laying eggs.  She looks OK and the workers are taking care of her.

Queen & eggs

Frame 7 is the Drone frame.  It has been partially drawn out but the queen has not got to it yet.  In the meantime the bees are storing some syrup on it.  I'd love to use these drone frames in the honey suppers.  The cells are much bigger than normal brood cells.  So more space would be dedicated to honey than comb wall.

On frame 6 there was 2 Queen cups.   At first I thought they were Supercedure cells.  Since then I have learned that they are only 'Cups'.  The bees regularly construct Queen cups.  So if something happens to the Queen they can quickly form a emergency Queen cell.  As much as they are always making these they are also tearing them down.  So there should always be some somewhere in the hive.  I mentioned this to one of the Bee club leaders.  They thought the stress of being shipped was enough to cause the bees to make these so soon.  As of now it doesn't seem to mean anything is wrong with the colony.  I'll be watching for any other signs though.

Queen cup.  Currently filled with pollen

The colony is looking good.  They are building up the comb & population.  They may need another hive body in the next week or two.  She doesn't have a name yet because it's too early to know what she's like.  It'll be 45 days, or so, until all the bees are daughters of the Queen.  Then I can get a good idea of what the colonies personality is going to be like.  I'd settle for calm & productive, but who wouldn't.

    Wednesday, April 21, 2010

    Package & Installation

    The Queen cage is a small cage containing the Queen and sometimes several attendants.  It is used to ship the Queen either individually or as part of a 'Package'.  

    Typically, there is a small hole at the end of the queen-cage for the queen to exit by.  It is plugged with a cork on the outside.  It leads into a larger hole filled with a bee candy stopper (corn syrup & sugar).  The queen is trapped in a compartment on the other side of the bee candy.

    To release the queen I remove the cork exposing the candy.  Then set the queen cage into the hive between 2 frames.  After which the bees are added separately.  The bees eat through the candy.  Which in turn releases the queen.

    While the queen is waiting to be released the bees feed her through the screen.  This process gives the bees time to acclimate to the presence of their future queen.  Otherwise they could reject her.
    ---   ---   ---

    This is the shipping box for the bees. The large can is filled with sugar syrup to feed the bees while they are in the box.  The small silver circle is a flange which is connected to the queen cage.  Before I remove either one, I spray the bees with a 1:1 sugar syrup. I also spray all of the frames with the same 1:1 sugar syrup solution. Then I tap the cage to knock the bees down to the bottom of the box.  After which I remove the queen cage and cover up the hole with the wooden plank.
    -
    Once removed the queen can be inspected.  There may be attendants with the queen or not.  In this case there is a handful but 2 are dead.  At this point the beek removes the cork covering the 'bee candy'.  The apiary these bees came from uses the tin disk that holds the queen cage in place instead.  So off comes the disk.
    -

    Now I punch a small hole through the bee candy.  This tells the bees they can free the queen by eating through the candy.  Some queen cages come with a nail attached.  My Wife lent me one of her sewing needles for this task.  Be careful not to stab any bees!
    -

    Now orient the cage so the top is up.  The top being the end with the bee candy.  Then attach a strip of wire or paper board to the side of the cagePaper board is what they make cereal boxes out of and just about everything else in a store that isn't wrapped in plastic (**Update** - use tin or plastic strips, or wire.  These bees chewed the paper board apart).  Make it an inch thick since the bees will be chewing on it.  Secure it to the cage with either a thumbtack or office staple. 
    -

    To hang the cage on a frame, again, use a thumbtack or office staple.  Remember candy end UP!.  the candy side is the exit out.  If it is facing the bottom and an attendant dies she will block the exit.  Then the queen will be trapped. Also make sure the screen is in a direction that will have better access to the other bees.  Perpendicular to the frames will do it. 
    -

    Now take the syrup can out of the big box and shake the bees into the hive directly over the queen cage.  Roll the box from side to side to get the bees out.  Then place the box by the front entrance so the few remaining bees can walk into the hive.  
    -
    When the bees slowly crawl up the frames toward the queen is a good sign.  If they quickly ball up around her is a sign of rejection.  This looks good.
    -

    After which I replace the outside frames and move all the frames back into the centered position.  Slowly!  Then I add the Hive Top Feeder filled with 1:1 sugar syrup medicated with Fumagilin.  I put on the inner cover & the telescoping cover.  Then reduce the size of the entrance.

    That's how I hived my 2010 Package!